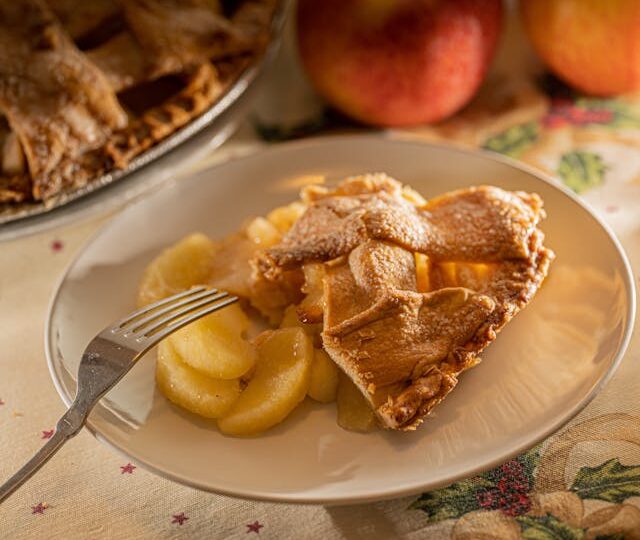
There’s something magical about baking your own apple pie, don’t you think? The way the scent of cinnamon and apples fills the house, warming it from the inside out. For me, making apple pie is more than just whipping up a dessert—it’s about creating a moment of comfort and connection. In this post, I’ll walk you through how to make your very own homemade apple pie, share a few tips, and explain why this sweet treat is more than just a pastry.
Why Homemade Apple Pie?
Apple pie is a classic for a reason. It’s simple, yet so rewarding. Every bite is a blend of buttery, flaky crust, tender spiced apples, and just the right amount of sweetness. Whether you’re cozying up on a rainy afternoon, celebrating with friends and family, or just treating yourself after a long day, homemade apple pie adds a bit of nostalgia and warmth to any occasion.
But let’s be honest—store-bought pies don’t quite hit the same. They lack the love, attention, and personal touch that comes with making your own. Plus, the smell of baking apple pie is half the experience! Let’s dive in and create something wonderful together.
Ingredients
Before we get started, here’s what you’ll need:
For the crust:
- 2 ½ cups all-purpose flour
- 1 tablespoon sugar
- 1 teaspoon salt
- 1 cup (2 sticks) cold, unsalted butter, cut into cubes
- ¼ to ½ cup ice water
For the filling:
- 6-8 medium apples (Granny Smith or Honeycrisp work great)
- ¾ cup sugar (adjust to taste)
- 2 tablespoons all-purpose flour
- 1 teaspoon cinnamon
- ¼ teaspoon nutmeg
- A pinch of salt
- 1 tablespoon lemon juice (to keep the apples fresh and balance sweetness)
- 1 tablespoon butter (to dot on top of the filling before baking)
Optional: 1 beaten egg and sugar for a beautiful golden finish on the crust.

Step-by-Step Directions for a Perfect Pie
1. Making the Crust:
The crust is the foundation of your pie, and getting it just right makes all the difference. If you’ve never made a homemade pie crust before, don’t worry—it’s simpler than you think!
- In a large mixing bowl, whisk together the flour, sugar, and salt.
- Cut the cold butter into cubes and add it to the dry mixture. Using a pastry cutter (or even your hands), work the butter into the flour until the mixture resembles coarse crumbs.
- Slowly add ice water, one tablespoon at a time, until the dough starts to come together. You want it to be moist enough to hold together, but not sticky.
- Divide the dough into two discs, wrap them in plastic wrap, and refrigerate for at least an hour (or up to 2 days). This gives the butter time to firm up and ensures a flaky crust.
2. Prepping the Filling:
While the dough is chilling, let’s prepare the star of the show—the apples! For the best texture, use a variety of apples. Granny Smiths are tart and hold their shape, while Honeycrisp adds a touch of sweetness.
- Peel, core, and slice your apples thinly.
- Toss the apples with sugar, flour, cinnamon, nutmeg, salt, and lemon juice in a large bowl. Let them sit for 15-20 minutes so the flavors can meld together.
3. Assembling the Pie:
Now for the fun part—putting it all together!
- Preheat your oven to 425°F (220°C).
- Roll out one of your dough discs on a floured surface to fit your pie dish, leaving a bit of overhang. Gently place it into your pie pan, pressing it down to fit the edges.
- Add the apple filling, making sure to mound it slightly in the center. Dot the top with small pieces of butter.
- Roll out the second dough disc and carefully place it over the apples. Trim the excess dough, leaving a little extra to crimp the edges.
- Cut a few slits on top of the pie to allow steam to escape. For an extra golden, crispy finish, brush the top crust with the beaten egg and sprinkle some sugar over it.
4. Baking:
Place the pie in the oven and bake at 425°F for about 20 minutes, then reduce the temperature to 375°F (190°C) and bake for another 40 minutes. Your pie is ready when the crust is golden brown and the apple filling is bubbling through the slits.
5. Let it Cool:
This might be the hardest part—waiting! Let the pie cool for at least 2 hours before slicing into it. This allows the filling to set, making each slice clean and perfect.
Enjoying Your Homemade Apple Pie
Once your pie has cooled (or let’s be honest, after you’ve given it just enough time to slice without it falling apart), serve it warm with a scoop of vanilla ice cream or a dollop of whipped cream.
But more than just eating it, enjoy the moment that comes with it. Sit around the table with loved ones, or cuddle up with a blanket and a good book. Homemade apple pie is a small celebration in itself—a reminder of simple pleasures and the joy of creating something delicious from scratch.
A Few Tips:
- Don’t overwork your dough. The less you handle it, the flakier your crust will be.
- Adjust sweetness to your taste. Some apples are naturally sweeter, so feel free to play with the amount of sugar in the filling.
- Experiment with spices! If you love a little extra warmth, try adding a pinch of cardamom or ginger to the apple mixture.

Final Thoughts
There’s nothing quite like making and sharing a homemade apple pie. It’s a symbol of comfort, tradition, and the joy of baking something special with your own two hands. Whether you’re a seasoned baker or new to pie-making, this recipe is sure to be a hit in your kitchen. The only thing better than the taste is the smiles that come with every slice.
Happy baking from GertieBlu! I hope your apple pie turns out beautifully and brings some extra warmth to your day. Feel free to experiment with your own twists and enjoy the process as much as the delicious results!
🍏


